
AI Dress Up With Multiple Garment Photos: Build One Outfit
Build an AI dress up outfit from separate garment photos. Prepare references, set layer order in Studio Quality, and fix missing or merged clothing pieces.
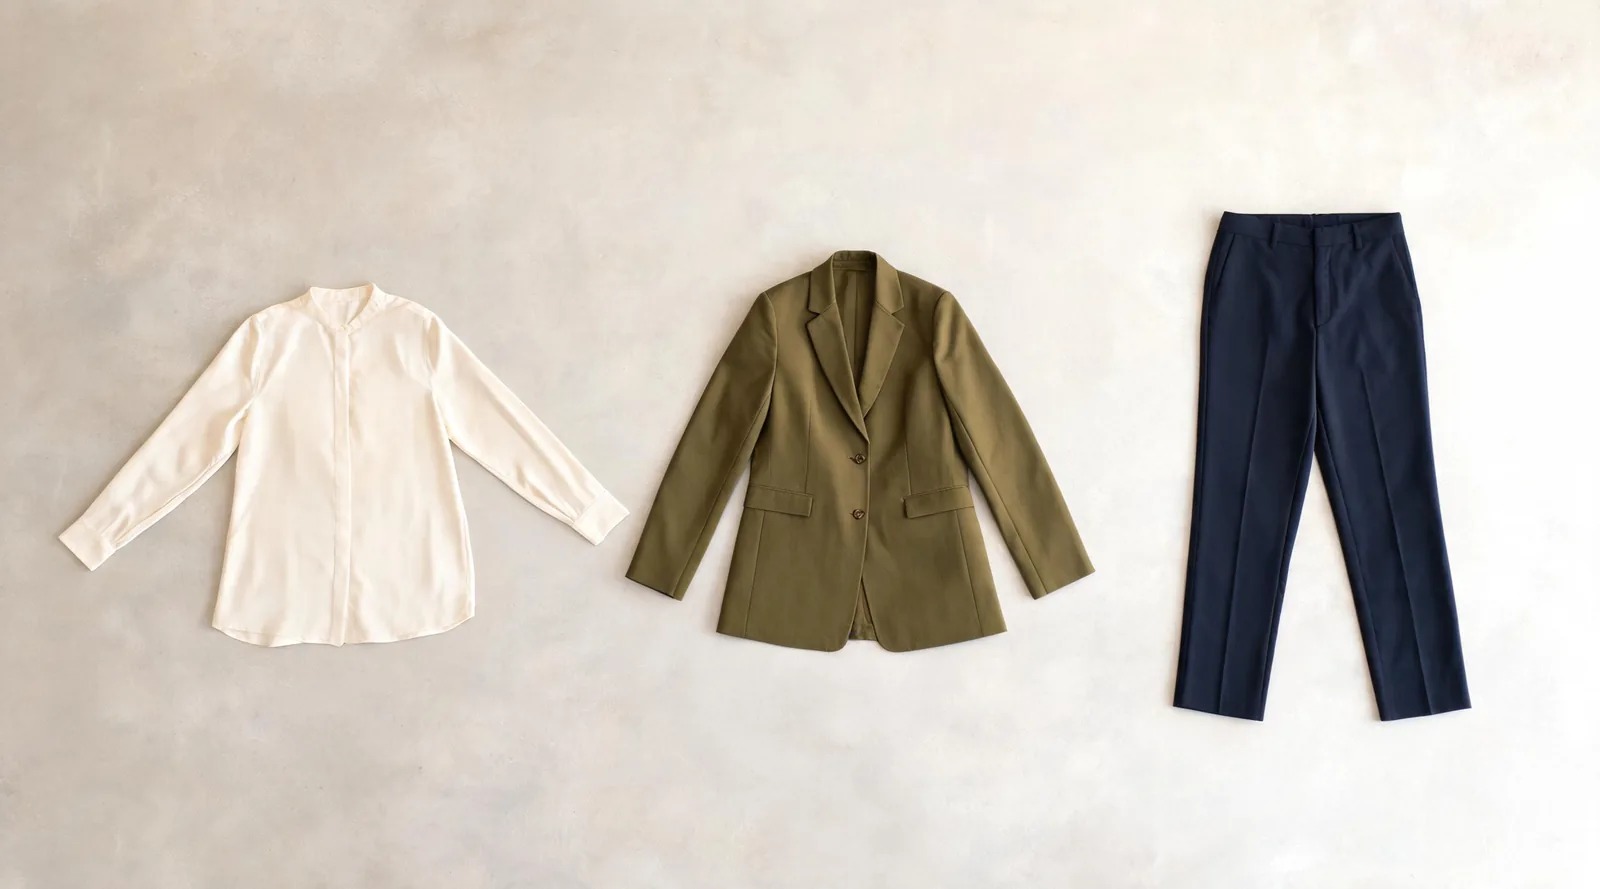
To build one AI dress up outfit from separate garment photos, use paid Studio Quality, upload a clear person photo and distinct clothing references, and state which piece goes where. The AI clothes changer supports up to six garment images in Studio Quality; Free Preview and Essential Try-On accept one outfit image. Inspect every layer before keeping the result.
Last updated: October 5, 2026 · ~7 min read
What are you assembling: one outfit or several options?
Separate garment photos can describe one coordinated look: an ivory shirt, an olive blazer, and navy trousers. They can also describe competing alternatives: three blazers you might wear with the same shirt. Those are different tasks. For assembly, choose one item for each role before uploading.
The AI dress up workspace uses your person photo as the base. In Studio Quality, additional garment references provide the clothing information. Do not use the available slots as a shopping shortlist and expect the result to know which jacket you prefer. Compare competing looks in separate attempts instead.
This tutorial describes AIClothSwap’s own workflow. The pictured outfit illustrates garment preparation and layer inspection. No generated look establishes size, fabric comfort, or exact product construction.
How do you prepare separate garment references?
Begin with three pieces that have clear jobs. A shirt, an open jacket, and trousers are easier to inspect than two overlapping coats plus several accessories. Lay out or hang each garment separately, with the entire item visible and enough contrast to read its edges.
Show the front of a front-facing outfit. Keep sleeves away from the torso of a flat-lay shirt so the cuffs and shoulder shape are visible. Photograph trousers with both legs readable. Avoid folded piles: a folded blazer does not clearly establish its length or lapels.
Use the garment photography guide when the item has a difficult shape. Plain backgrounds help distinguish garments from furniture or nearby clothes.
| Reference | Its role in the example outfit | Detail that must be readable |
|---|---|---|
| Ivory blouse | Inner upper layer | Collar, neckline, sleeves, and hem |
| Olive blazer | Outer upper layer, worn open | Lapels, front opening, sleeve ends, and length |
| Navy trousers | Lower garment | Waistband, leg shape, and hems |
| Person photo | Base pose and appearance | Face, torso, waist, and both legs |
Do not upload two front views of almost identical shirts unless you have a clear reason. Extra pictures can introduce conflicting colors or cuts. A detailed close-up can also be mistaken for a separate item if you do not explain it. For a first pass, one complete reference per garment keeps the request easier to follow.
Which person photo works for a layered outfit?
Use a full-body or sufficiently wide portrait if trousers and shoes matter. A torso crop is appropriate for a shirt-and-jacket question, but it cannot support a meaningful check of the whole outfit. Keep the pose ordinary and the camera angle reasonably level.
Look at the waist. A handbag, crossed arm, or oversized foreground object may hide the boundary between shirt and trousers. If that boundary is central to your question, choose another photo. Do the same for the collar if long hair or a scarf completely covers it.
Start with a simple silhouette and visible boundaries between clothing, hands, neck, and ankles. Keep the source image unchanged so you have a stable comparison later.
The virtual try-on workflow is a visual aid. If you need to know whether a jacket will close comfortably, measure the garment and consult its size information. An open-jacket preview cannot settle that question.
How do you combine the pieces in Studio Quality?
Use this three-step sequence:
- Upload the person photo and select Studio Quality. Studio is the paid option for multiple garment references. Check the selected mode before adding a second outfit image.
- Add the chosen pieces and describe their roles. Use distinct garment photos. Say which is the inner layer, which is the outer layer, and whether the shirt should be tucked in.
- Generate and inspect one complete outfit. Compare the output against the person photo and each reference. Correct the biggest mismatch before adding more complexity.
Here is an example instruction for the three-piece look:
Dress the person in the ivory blouse, the olive blazer, and the navy trousers from the reference photos. Wear the blazer open over the blouse, with the blouse tucked into the trousers. Keep the person’s face, pose, hair, and background consistent with the original photo. Keep the blouse collar visible inside the blazer lapels.
Name visible attributes instead of relying on “the second image” when the garment names are clearer. Use one unambiguous description for each item. If both upper layers are dark, mention their cut or texture so you can distinguish them.
Do not ask for a new location, a different stance, and an elaborate outfit in the first pass. Every additional edit creates another thing to assess. The prompt examples guide can help refine a specific instruction after the basic assembly is working.
How do you specify layer order without overloading the prompt?
Describe the relationship between pieces rather than repeating a long list of style adjectives. “Open blazer over tucked blouse” establishes more useful structure than “elegant, stylish, polished, fashionable outfit.” Add only details that affect the decision you want to make.
For a cardigan and dress, state that the cardigan is the outer layer and whether it is open or buttoned. For a shirt and trousers, state whether the hem is tucked. For a coat, decide whether you need to see the inner outfit at all; a closed long coat will hide much of it.
Layer relationships are a real challenge in generated clothing images. The research paper Toward Accurate and Realistic Outfits Visualization with Attention to Details identifies garment interactions and details such as hemlines and texture as important to multi-garment visualization. It is background research, not a benchmark for AIClothSwap.
A hidden layer is not always a failed edit. Decide which portions should remain visible, then check those portions against the references.
What should you inspect in the assembled outfit?
Follow the outfit from top to bottom. Check that the blouse collar belongs to the blouse rather than becoming a second set of blazer lapels. Look at the shoulders and cuffs: two garments should not merge into one continuous fabric when they are meant to remain distinct.
At the waist, check that the tucked hem and trouser waistband connect sensibly. Look for an invented belt, unexpected pocket, or repeated button. Follow the trousers down each leg and compare their silhouette with the reference.
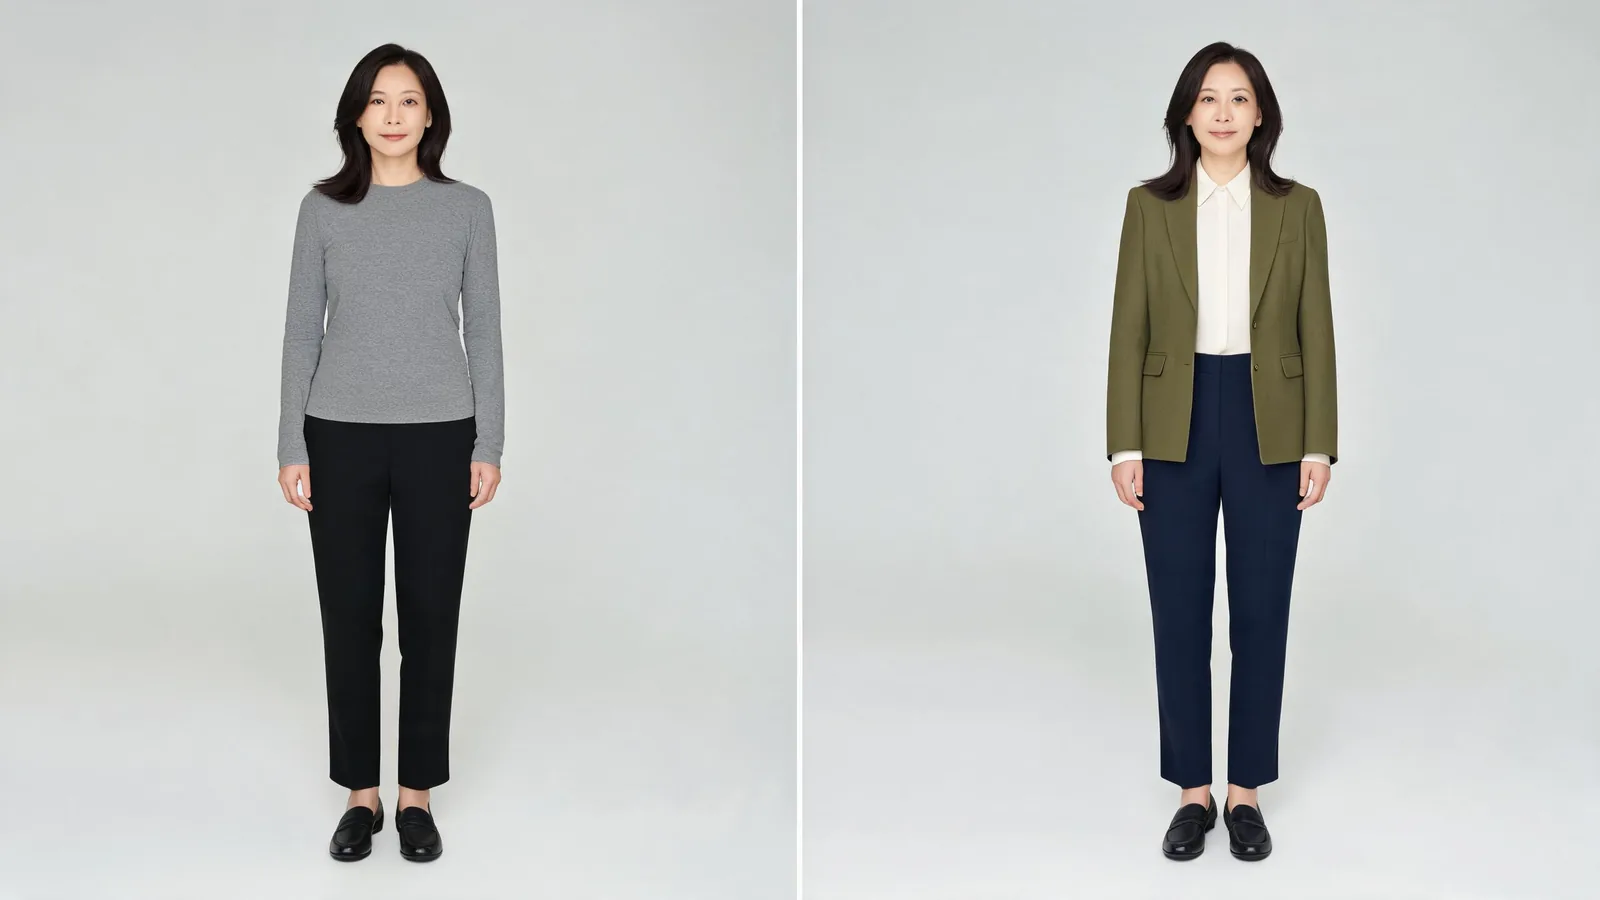 Illustrative assembly example: the collar, open lapels, and waist should remain readable as separate garment boundaries.
Also inspect the person. Faces, hands, hair, and posture can change during an outfit edit. Keep an output only when the clothing result and the person both satisfy your purpose. For detailed prints or logos, compare the reference closely; a plausible pattern is not necessarily a faithful reproduction.
How do you fix missing or merged garments?
Choose the correction from the visible problem. Avoid rebuilding the entire prompt every time.
| Problem | What to check first | Useful next attempt |
|---|---|---|
| Blouse disappears | Is the jacket closed or hiding it? | Ask for an open jacket with the blouse collar visible |
| Jacket and shirt merge | Are their colors and roles distinguishable? | Name each garment and its inner or outer position |
| Wrong trousers appear | Does the reference show complete legs? | Replace the folded or cropped reference with a full view |
| Extra garment is invented | Is an alternative still among the uploads? | Remove competing choices and use one item per role |
| Face or pose changes | Does the request include unrelated edits? | Return to the original person photo and simplify instructions |
If you need to diagnose one difficult piece, test a simpler combination first. Try the blouse and trousers, then include the blazer in a fresh attempt using the original person photo. That can help you identify which reference or layering request needs work without stacking edits on top of an already altered face.
Do not keep adding images simply because a piece was omitted. First ask whether the reference is readable and the instruction is consistent. Six is the maximum number of garment images, not a recommended number for every outfit. The Essential versus Studio guide explains the mode choice if a simpler one-reference preview is enough.
When should you stop refining the preview?
Stop when the image answers your styling question or when the inputs cannot support the detail you need. If you can judge the relationship between jacket length and trouser shape, the preview may already be useful. If you need exact embroidery placement for a retail listing, an approximate generated design is insufficient.
For an outfit you intend to buy, return to product measurements, material descriptions, and real photographs. If you only want to change the existing garment’s shade, a clothes color changer is a more focused task than assembling a new wardrobe. Keep the next attempt tied to one specific unresolved decision.
Frequently asked questions
Can I combine several clothing photos in one AI dress up image?
Yes. AIClothSwap’s paid Studio Quality accepts up to six garment images alongside your person photo. Choose distinct pieces, describe their roles, and inspect the output because references do not guarantee exact reproduction.
Can I use multiple garment photos in Free Preview or Essential Try-On?
No. Free Preview and Essential Try-On accept one outfit image. Select paid Studio Quality before adding separate garment references for a combined outfit.
Why does one garment disappear from my outfit preview?
It may be hidden by another layer, unclear in its reference, or ambiguous in the instructions. Check its photo, name the item and its role, and simplify the outfit before trying again.
Should I upload six references for every outfit?
No. Six is the maximum, not a target. Start with the fewest images that define the outfit, such as a shirt, jacket, and trousers, and add an accessory only when it changes your decision.
Related guides
- Try the free AI clothes changer →
- AI dress up
- Virtual try-on
- Best AI dress up apps for real-photo previews
- How to photograph clothes for AI outfit edits
Build a small, readable outfit
Prepare one clear person photo and a few distinct pieces, then assemble the look with AIClothSwap.