
Flat Lay Clothing Photos with AI: From Layout to Try-On
Create flat lay clothing photos with AI using a garment reference, compare styling variations, and preview the shirt on a person with virtual try-on.
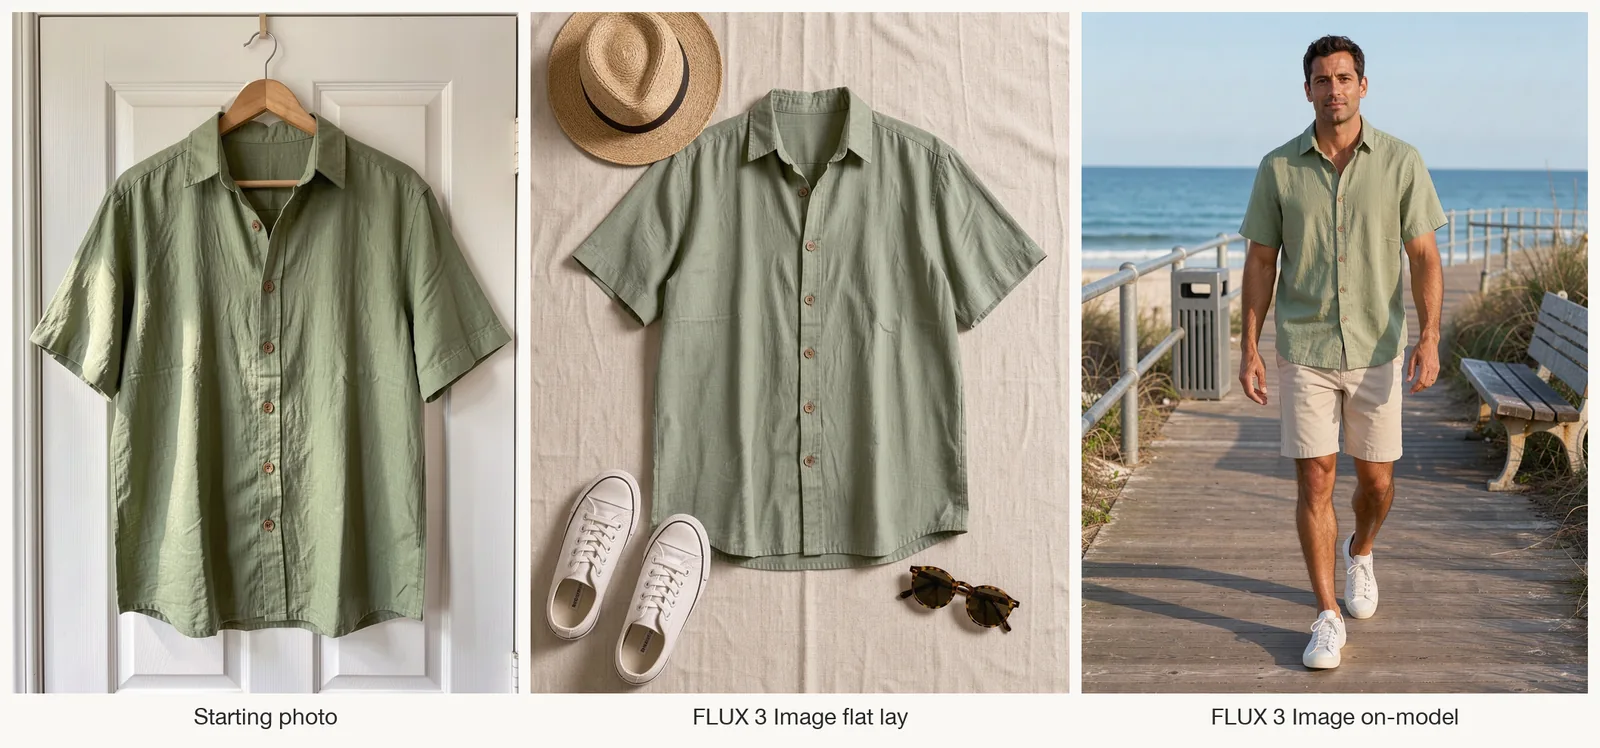
Flat lay clothing photos show a garment laid out on a surface and shot from straight above. To make one with AI, give an image model a clear photo of the garment, describe the layout, background and props, then check the result against the real item. You can reuse the flat lay as the garment reference in an AI clothes changer to see it on a person.
Last updated: October 2, 2026 · about 7 min read
For a photographed flat lay, arrange the garment on a clean surface, smooth the fabric, and position the camera directly above it. With AI, the reference photo supplies the garment and your prompt describes the arrangement. This guide follows one shirt from a hanger image to a flat lay, a boardwalk scene and a try-on preview. Both the starting shirt image and the person image in this example were AI-generated.
What makes a flat lay clothing photo work
A useful flat lay makes the garment easy to see. These details matter in both photographed and generated images:
| Element | What good looks like | Common mistake |
|---|---|---|
| Angle | Straight down, so the garment isn't distorted | A slight tilt that makes one side look bigger |
| Shape | Buttoned and smoothed, sleeves folded or posed with intent | Lumpy fabric and twisted plackets |
| Background | One calm texture (linen, paper, wood) that contrasts with the garment | A busy pattern or a color too close to the fabric |
| Props | Two or three items that suggest how it's worn | A crowded table that hides the product |
| Light | Soft daylight with gentle shadows | Hard flash, or shadows that cut across the garment |
| Accuracy | Color, buttons, collar and print match the real item | A "nicer" shade that the customer won't receive |
For a product listing, accuracy matters more than styling. A changed collar, missing seam or extra button can misrepresent what you sell.
Step 1: Start from a plain product photo
Our starting image is a sage green short-sleeve shirt on a wooden hanger against a white door, wrinkles and all, in side light from a window. We generated it to stand in for the quick phone snapshot most sellers already have. For your own listing, start from a real photo of the garment you sell.
What matters in the starting photo:
- The whole garment is visible, including the collar, cuffs and hem.
- The color is close to the real thing. Shoot in daylight and skip filters.
- Details you need to keep, such as buttons, prints and stitching, are sharp.
Step 2: Turn it into a flat lay with a reference-based model
For the flat lay, we used FLUX 3 Image from Black Forest Labs, which accepts up to ten reference images and written editing instructions. To run the same model in a browser, you can use a FLUX 3 Image generator called flux-3image, an independent web app that isn't affiliated with Black Forest Labs.
Prompt: Turn the shirt from image 1 into an ecommerce flat lay: the same sage green linen shirt laid flat and neatly buttoned, sleeves folded in slightly, shot straight from above on a warm oatmeal linen backdrop. Arrange a straw hat at the top left, round tortoiseshell sunglasses at the bottom right and a pair of white canvas sneakers at the bottom left. Keep the shirt color, fabric texture, collar and coconut buttons exactly as in image 1. Soft natural daylight with gentle shadows.
Settings: FLUX 3 Image edit, 1 reference, 1K, 4:5.
Then we used the same reference for an on-model shot: an adult model wearing the shirt untucked with beige chino shorts on a seaside boardwalk, full body, at a 3:4 ratio.
The hero shows the hanger image on the left, the flat lay in the center and the boardwalk scene on the right. The hat, sunglasses and sneakers landed in the requested positions. The flat lay's sleeves are spread rather than folded inward, and the boardwalk shirt appears lighter than the reference. Compare collars, buttons, seams and color in each output before treating it as a product image.
Step 3: Make scene variations from the same reference
Once you have a useful flat lay, try changing one part of the scene at a time while asking the model to preserve the shirt:
- Background: swap the oatmeal linen for white paper, light oak or terracotta.
- Season: trade the straw hat and sneakers for a knit beanie and boots.
- Crop: try a 4:5 portrait, a 1:1 square or a 9:16 vertical layout, leaving enough room to show the whole garment.
- On-model scenes: beach, café, city street. Keep the shirt description identical in every prompt.
Change one variable per prompt so differences are easier to spot. Keep the original garment photo as your reference; a generated variation can carry errors into the next image.
For on-model images, see the AI fashion model generator. Check those results against the garment just as closely as a flat lay.
Step 4: Use the flat lay in a virtual try-on
To preview the garment on someone, use a person photo as the base and the flat lay as the clothing reference. For this example, AIClothSwap's virtual try-on received an AI-generated image of a fictional adult man in a gray T-shirt, followed by the flat lay. You can use your own photo for the same kind of preview.
Instruction: Dress him in the sage green linen short-sleeve shirt from the second image, buttoned and worn untucked.
Settings: AIClothSwap virtual try-on, Studio Quality, person photo + 1 garment reference, 3:4.
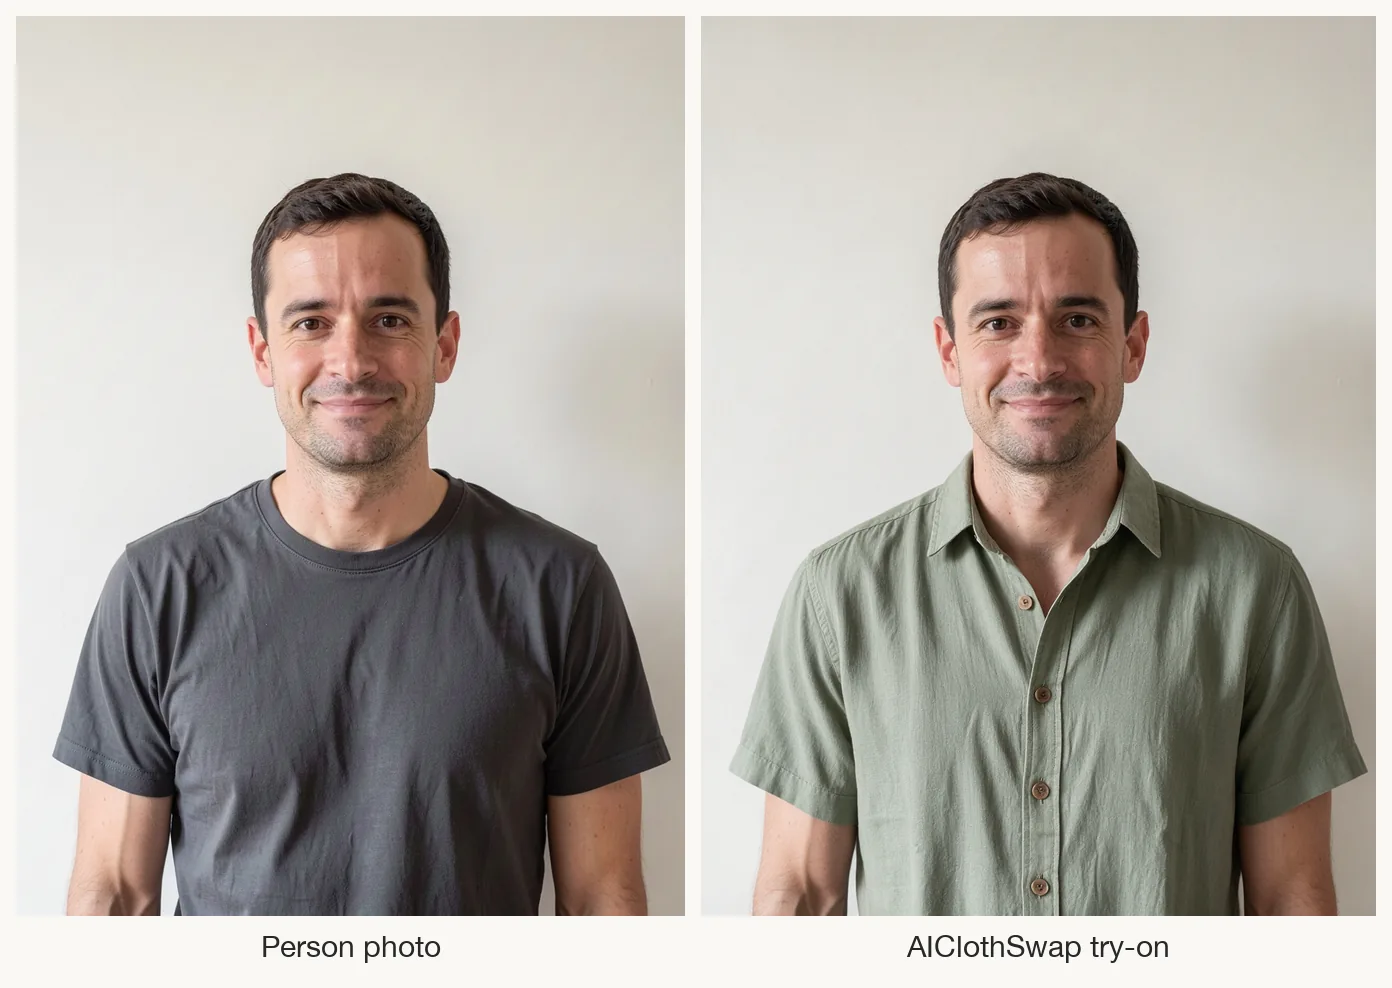
Left: the AI-generated person image. Right: the try-on result using the hero's center flat lay as the garment reference. The framing and plain wall look similar in both images.
The shirt came through with the right color, pointed collar, short sleeves and wooden buttons, and the background stayed the same. His expression shifted slightly, so compare faces closely if you use your own photo. The crop doesn't show the hem, and no preview can tell you how a specific size will fit.
For more styling ideas, see the men's outfit generator. To explore color variations, use the clothes color changer, then compare the result with the actual colorway before using it in a listing.
Before you publish: an accuracy check
Use AI flat lays to explore layouts and styling. Before adding one to a product listing, check these details against the physical garment:
- Color under daylight, next to the screen.
- Buttons, pockets and seams, counted and placed correctly.
- Prints and logos that weren't warped or invented.
- Proportions, so sleeve and body length look right.
- Disclosure. If the platform requires you to label AI-generated or edited images, do it.
If the AI version and the real item differ in a way a customer would notice, either fix it or use a real photo for the listing. For related guidance, see AI clothing models for ecommerce and keeping product colors consistent.
Frequently asked questions
Can AI make flat lay photos of clothes?
Yes. Give an image model that accepts reference photos a clear photo of the garment and ask for a top-down flat lay with a specific background and props. Check the color, buttons and details against the real item before you use it.
What background is best for a flat lay of clothing?
A single calm texture that contrasts with the garment: white paper, light linen, wood or a solid color. Avoid busy patterns and colors close to the fabric's own color.
How do I keep the garment the same across AI variations?
Use the original garment photo for each variation, describe the shirt the same way every time, ask the model to keep its color, collar and buttons, and change one scene detail at a time. Then check each result against the real garment.
Can I see how a flat lay garment looks on me?
Yes. Use the flat lay as the garment reference in a virtual try-on with your own photo. The result can help you picture the style and color on yourself. It cannot confirm size, measurements or how the fabric will drape on you.
Related guides
- Try the AI clothes changer →
- Preview a garment on your photo with virtual try-on
- Create on-model catalog shots with the AI fashion model generator
- AI clothing models for ecommerce
- Keep clothing colors consistent across product photos
From flat lay to "how it looks on me"
Choose a flat lay that matches your garment, then use it with your own photo for a styling preview. Check the clothing details in both results before sharing them. Preview the garment on your photo →