Why AI Clothes Swaps Look Fake and How to Fix Them
AI clothes swaps look fake when the photo, garment, or prompt asks too much. Use this troubleshooting guide to fix warped outfits and identity drift.

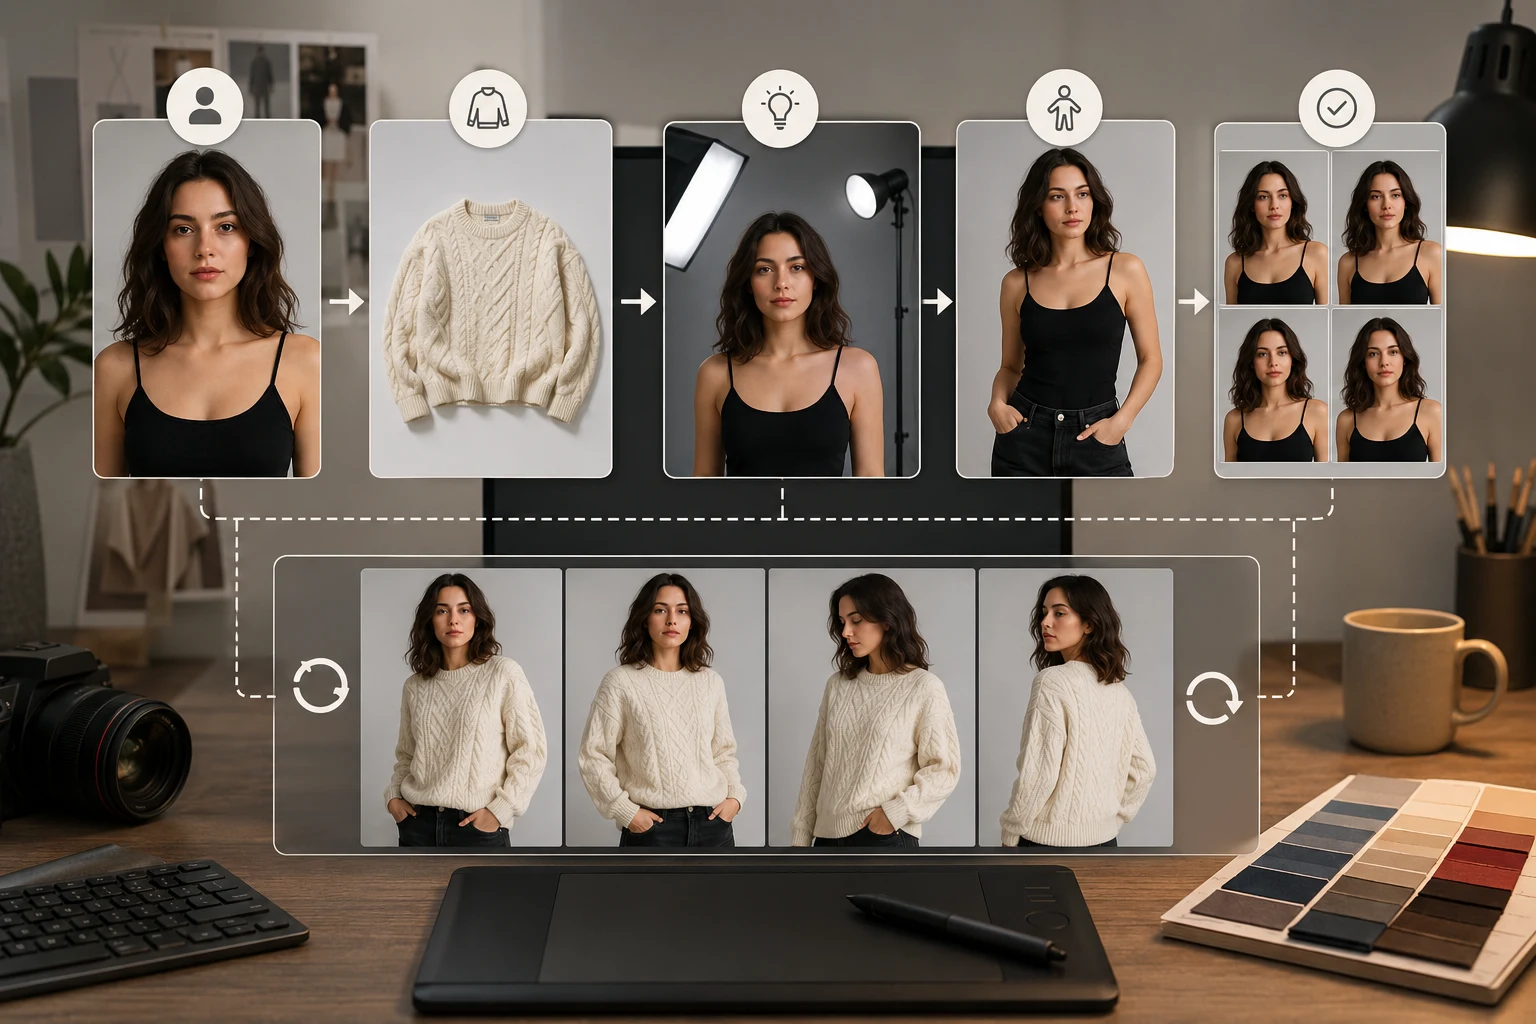
AI clothes swaps look fake when the edit asks the model to rebuild too many things at once: body shape, garment structure, fabric texture, lighting, hands, and identity. The fastest fix is to start from a clean photo, change one garment at a time, and use an AI clothes changer prompt that protects the face, pose, and background.
Last updated: July 2, 2026 - about 9 min read
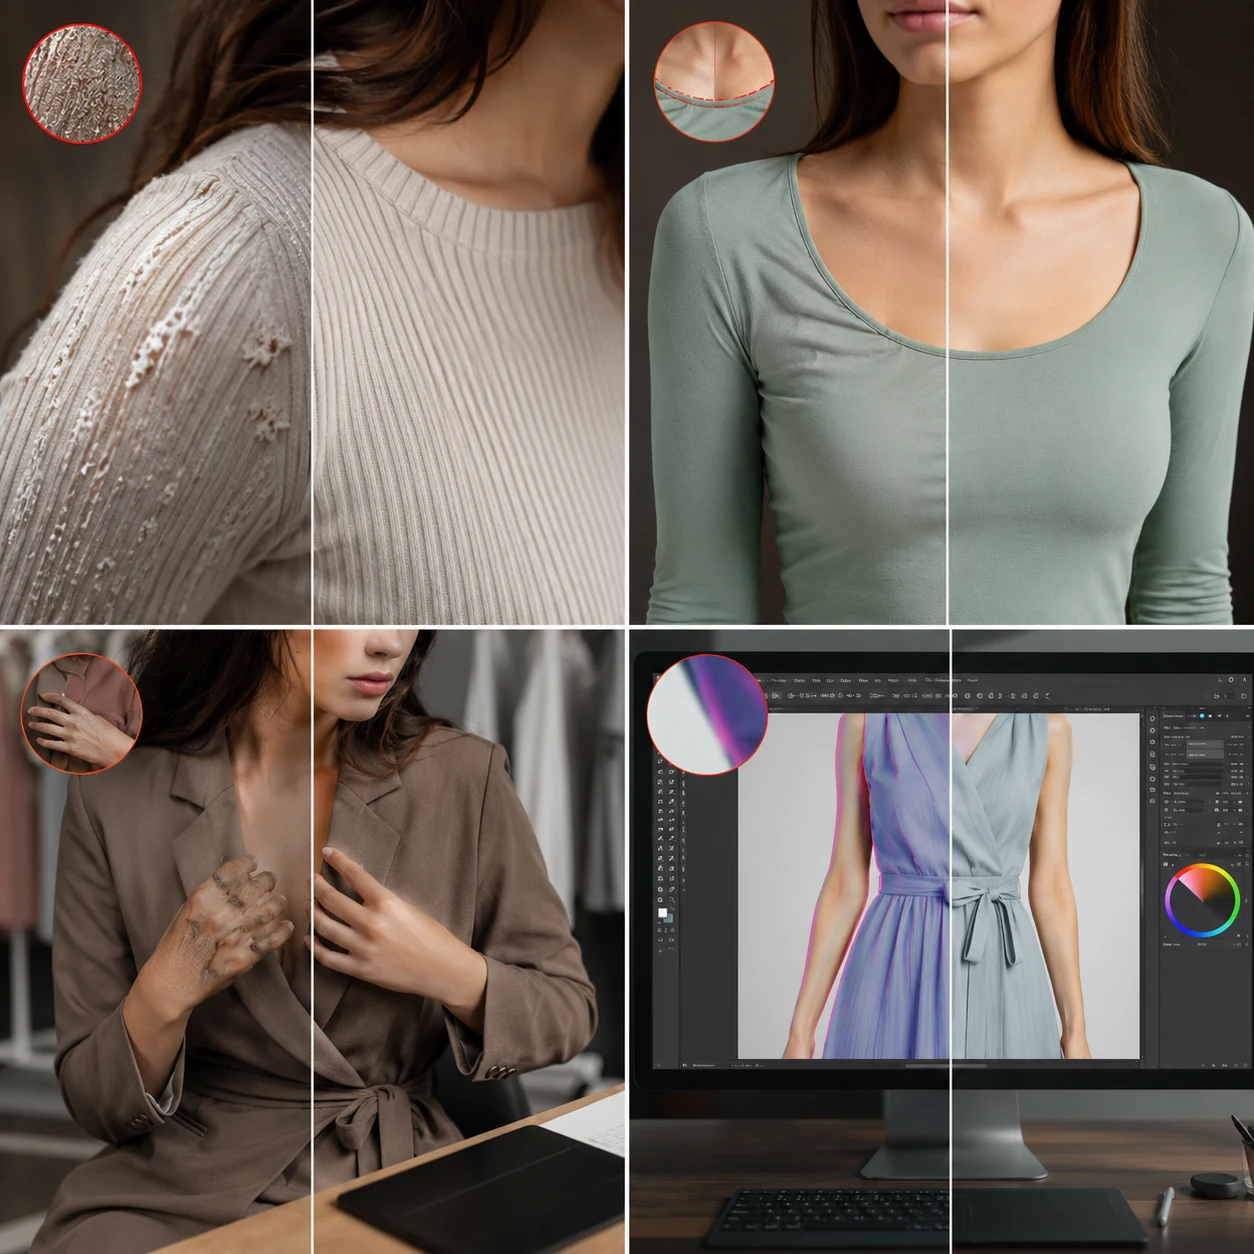
If your result has melted fabric, a changed face, twisted hands, or a neckline that does not follow the body, the problem is usually not "AI is bad." It is a mismatch between the input photo, the garment request, and the amount of transformation you asked for.
This guide is a practical diagnosis map for the exact moment when AI clothes swaps look fake and you need to know what to fix first. Use it before you waste credits regenerating the same bad prompt.

A clothes swap becomes more believable when the original pose, lighting, and garment boundaries give the model something stable to preserve.
The 6 reasons AI outfit swaps look fake
Most fake-looking clothes edits come from one of these six issues. If your AI clothes swaps look fake again and again, the cause is usually in this table rather than in one missing magic prompt word:
| Problem | What you see | Why it happens | First fix |
|---|---|---|---|
| Weak source photo | Blurry seams, warped collar, muddy texture | The model cannot see the original body and garment edges clearly | Use a sharper, brighter photo |
| Hidden clothing | Hands, bags, hair, or jackets cover the garment | The model has to guess what is underneath | Retake or crop before editing |
| Impossible garment request | A hoodie becomes a strapless dress, or a tight tee becomes a heavy coat | The target outfit needs a new body silhouette | Pick a closer garment first |
| Vague prompt | Random fabric, wrong neckline, wrong sleeve length | "Make outfit stylish" gives no clothing structure | Name garment type, color, fit, and key details |
| Identity not protected | Face, hair, or body shape changes | The prompt only describes the new outfit | Add a preservation line |
| Too many edits at once | Everything looks different, not just clothes | The model is replacing the whole image | Change one area per render |
The fix is not a longer prompt. It is a narrower edit.
Start with the photo: input quality is the hidden ranking factor
An AI clothes swap can only preserve what the source photo makes readable. A realistic outfit edit starts before the upload.
Use a photo where:
- The clothing area is visible from neckline to hem.
- The face is sharp enough that identity can be preserved.
- The pose is natural and not heavily twisted.
- Hands are not covering the torso.
- Lighting is soft and consistent across the body.
- The background is not more visually complex than the person.
Avoid photos where:
- The person is half out of frame.
- The original outfit is black-on-black or white-on-white with no edge detail.
- Hair covers the collar and shoulders.
- A bag, phone, folded arm, or object sits on top of the clothing.
- Heavy shadows split the body into dark and bright zones.
Input quality is the easiest lever to improve. A clean source photo often fixes more than prompt tweaking.
Protect identity before you describe the outfit
Many people write prompts like:
Change the clothes to a black suit.
That sounds clear, but it leaves out the most important instruction: what should stay unchanged.
Use this safer structure:
Keep the same person, face, hair, pose, body shape, lighting, and background. Change only the clothing to a fitted black suit with a white shirt. Keep the neckline and shoulders natural.
The preservation line matters because clothing sits on the body. If the model rebuilds the garment without a constraint, it may also reshape shoulders, neck, face, hairline, or hands.
Use one garment change per render
The fastest way to make an AI outfit edit look fake is to request a full styling transformation in one pass:
Change the shirt, add a blazer, change pants, add jewelry, make the person thinner, improve the background, and make it cinematic.
That is not one edit. It is a new image.
Break it into stages:
- Swap the main garment.
- Check face, hands, neckline, and fabric folds.
- If the first output is stable, run a second edit for color, layer, or accessory.
- Use the best version as the new source only when the identity still looks correct.
One clean edit almost always beats one ambitious edit.
Match the target outfit to the source pose
Some clothes are naturally easier to swap than others. The model must wrap the new garment around the pose that already exists.
| Source pose | Safer outfit swaps | Risky outfit swaps |
|---|---|---|
| Front-facing headshot | Shirt, blouse, blazer, suit jacket, sweater | Strapless dress, wide coat, full-body gown |
| Full-body standing photo | Dress, coat, suit, pants, skirt | Outfit with hidden legs or dramatic fabric movement |
| Arms crossed | Color change, simple top replacement | Any garment that needs visible torso seams |
| Side profile | Jacket, hoodie, coat | Symmetrical formalwear or front-button shirts |
| Seated photo | Top, blazer, sweater | Full outfit swap with pants and shoes |
If you want a big silhouette change, use a source photo with enough body and empty space around the person. A cropped portrait cannot become a believable full outfit.
Diagnose the result by failure type
Use the failure pattern to decide what to fix. Do not regenerate blindly.
Look at the failure first, then change the input, prompt, or edit scope.
If the face changed
The edit touched more than the clothing.
Fix it:
- Add "keep the same face, hair, expression, body shape, and background."
- Use a source photo where the face is clear.
- Avoid prompt words that describe the person instead of the outfit.
- Do not ask for beauty retouching in the same render.
Better prompt:
Keep the same person, face, hair, expression, pose, and background. Change only the hoodie to a navy blazer over a plain white shirt. Keep the shoulders and neck natural.
If the fabric melts
The target garment is probably too complex for the photo.
Fix it:
- Use a simpler garment first.
- Avoid tiny patterns, lace, sequins, logos, complex folds, and transparent fabric.
- Keep the camera angle close to the original clothing shape.
- Ask for a clean material, not a runway-level fabric description.
Better prompt:
Change the t-shirt to a clean dark green knit sweater. Simple ribbed texture, natural sleeves, no logo, no pattern. Keep the body shape and pose unchanged.
If hands warp
Hands are often touching or crossing the clothing area.
Fix it:
- Retake with arms relaxed at the sides.
- Crop to a head-and-shoulders frame if the hands do not matter.
- Ask for a top-only edit instead of a full-body change.
- Do not request sleeves that must wrap around hidden wrists.
If the original photo has one hand over the chest, a new blazer may have to invent lapels underneath the hand. That is where the weirdness starts.
If the neckline looks wrong
The collar, hair, neck, and shoulders are competing.
Fix it:
- Choose a source where the neck and shoulder line are visible.
- Name the neckline: crew neck, v-neck, button-up collar, blazer lapel.
- Avoid changing from a high collar to a very low neckline unless the source gives enough skin/neck detail.
Better prompt:
Replace the sweatshirt with a fitted black crew-neck top. Keep the original neck position, shoulders, hair, and face unchanged.
If colors bleed into skin or background
The clothing boundary is unclear.
Fix it:
- Use a color-only edit if the garment shape is already right.
- Name the exact clothing area: shirt, dress, jacket, pants.
- Avoid editing background and clothing together.
- If the clothing is the same color as the background, use a different source photo.
For recolors, read how to change clothes color in a photo. Color-only edits are usually safer than full garment swaps.
A realistic prompt template
Copy this structure:
Keep the same person, face, hair, pose, body shape, lighting, and background. Change only [original garment] to [target garment]. The new garment should be [color], [fit], [material], with [1-2 details]. Keep [protected areas] natural. No changes to face, hands, skin, or background.
Examples:
| Goal | Prompt |
|---|---|
| Casual to professional | "Keep the same person, face, hair, pose, and background. Change only the hoodie to a navy tailored blazer over a white shirt. Keep the shoulders and neckline natural. No changes to face or hands." |
| Try a dress | "Keep the same person and pose. Change only the outfit to a simple emerald midi dress with short sleeves and soft fabric folds. Keep face, hair, arms, and background unchanged." |
| Sweater preview | "Keep the same person, pose, and lighting. Change only the t-shirt to a cream knit sweater with a clean crew neck. Natural fabric texture, no logo, no pattern." |
| Color-safe edit | "Keep the exact same clothing shape and texture. Change only the shirt color to deep burgundy. Do not change face, skin, hair, background, or garment fit." |
When to retake instead of regenerate
Regeneration helps when the prompt was vague. Retaking helps when the source image is the problem.
Retake the photo if:
- The garment is cropped.
- Hands cover the clothing.
- The photo is blurry or very low resolution.
- The body is angled in a way that hides half the outfit.
- The original and target outfit need very different silhouettes.
Regenerate with a better prompt if:
- The photo is clean but the garment style is wrong.
- The color is close but slightly off.
- The neckline or sleeve detail needs clearer wording.
- The face changed because you forgot a preservation line.
Best workflow for believable clothes swaps
If AI clothes swaps look fake in one photo but not another, follow this order instead of changing everything at once:
Use this sequence:
- Pick a clean source photo.
- Decide the exact garment change.
- Write the preservation line first.
- Render one outfit change.
- Inspect face, hands, neckline, shoulder shape, and fabric texture.
- Save the best result.
- Run a second pass only if you need color, layer, or detail adjustments.
This workflow feels slower than writing one giant prompt, but it produces fewer throwaway outputs.
Frequently asked questions
Why does an AI clothes swap change my face?
The edit is too broad or the prompt does not protect identity. Add a line that says to keep the same face, hair, expression, pose, body shape, lighting, and background, then change only the clothing.
How do I make AI clothes swaps look more realistic?
Use a sharp photo with the clothing fully visible, avoid crossed arms, change one garment at a time, name the target garment clearly, and add a preservation line for face, pose, hands, and background.
Why do hands look weird after changing clothes?
Hands often overlap sleeves, shirts, jackets, and waistlines. If the hand covers the garment boundary, the model has to invent fabric underneath it. Retake with hands away from the torso or crop the image.
Is it better to change clothing style or clothing color first?
If the shape is already good, change color first because it is safer. If you need a new outfit, change the garment first, then run a smaller color or texture adjustment only after the body and face still look right.
Can AI replace a casual outfit with a suit?
Yes, especially from a front-facing upper-body photo where the neck, shoulders, and torso are visible. Try a prompt that changes only the hoodie or t-shirt to a suit jacket while keeping the face, hair, pose, and background unchanged.
Related guides
- Try the AI clothes changer
- Best AI clothes changers in 2026
- Best photo for an AI clothes changer
- How to change clothes in a photo with AI
- Change clothes color in a photo
- Clothes color changer
Fix the input before blaming the output
Open the AI clothes changer, upload a clean source photo, and make one clothing change with a preservation line. If the first result looks fake, diagnose the failure type before you regenerate. The best clothes swaps are usually the most controlled ones.