Best Photo for an AI Clothes Changer: 8 Rules for Realistic Results
The best photo for an AI clothes changer has a clear pose, visible clothing, soft light, and enough room around the body. Use these 8 rules before you upload.
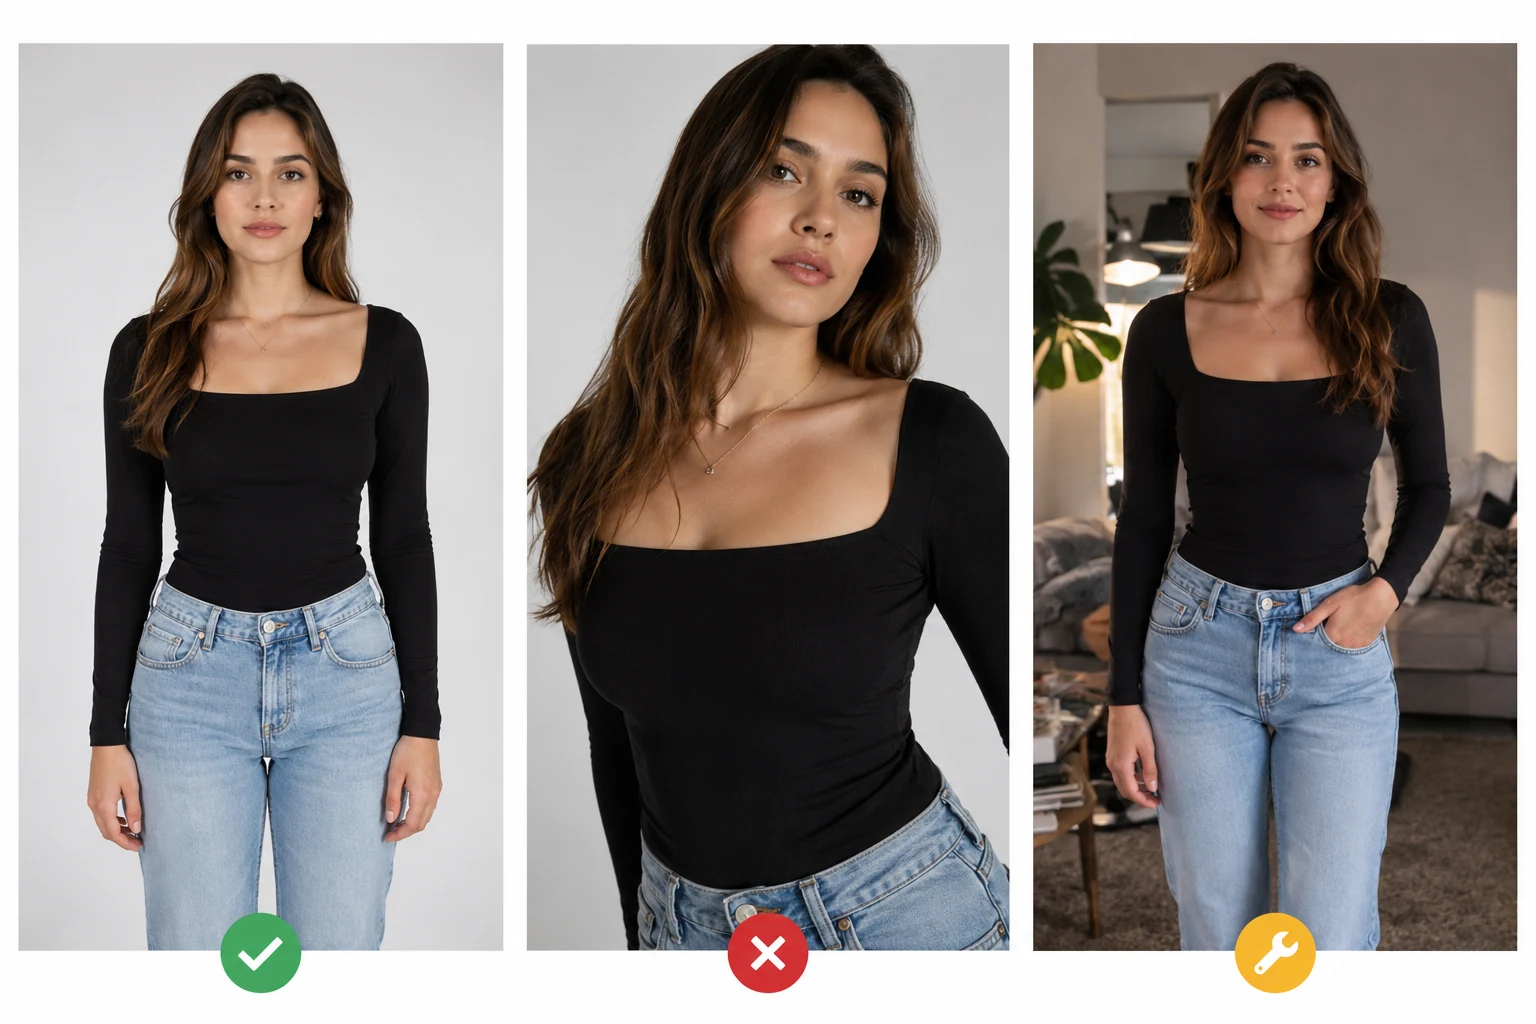
The best photo for an AI clothes changer is sharp, front-facing, evenly lit, and shows the full garment you want to change. If the photo hides the torso, crops the outfit, or covers clothing with hands, even a good prompt will struggle to create a realistic result.
Last updated: July 2, 2026 - about 8 min read
Most people try to fix bad outfit edits with a longer prompt. Start earlier. The source photo controls whether the AI can preserve the person, follow the body shape, and replace clothing without warping hands, collars, or fabric folds.
If you are trying to choose the best photo for an AI clothes changer, judge the upload by garment visibility, pose, lighting, crop, and how much the new outfit has to invent. The best photo for an AI clothes changer makes the edit small enough to stay believable.
Use this checklist before you upload.

A good source image makes the edit smaller. A risky source image forces the AI to invent hidden clothing and body edges.
Quick answer: what photo works best?
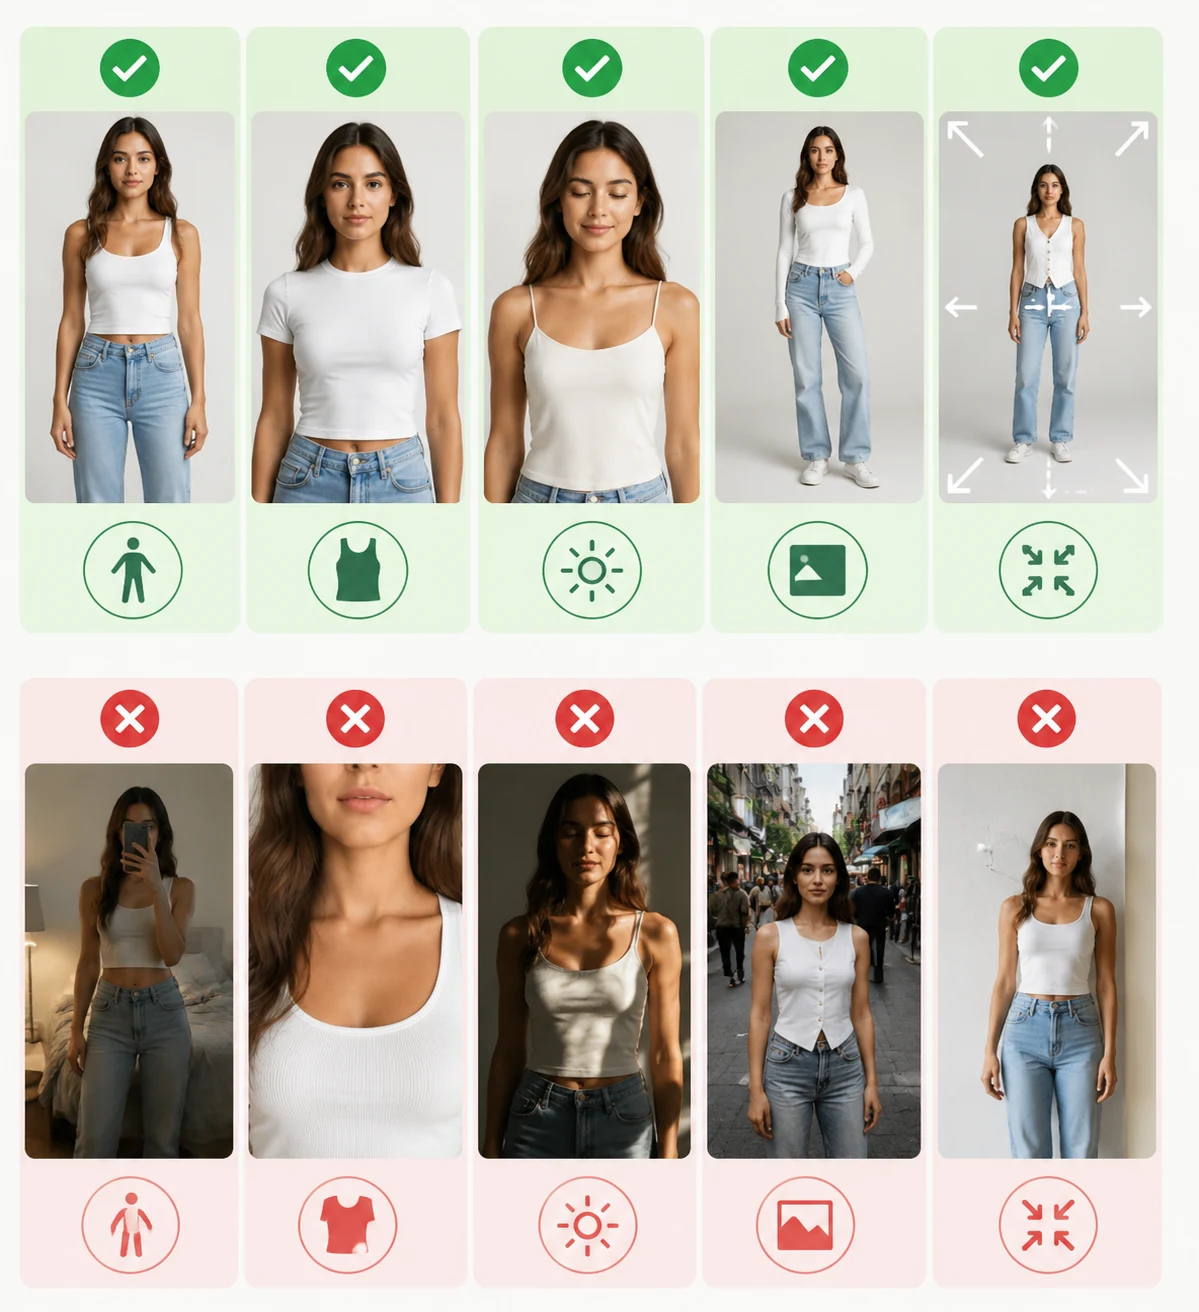
The best photo for an AI clothes changer is usually a clean front-facing or slight three-quarter image with the clothing area visible. Use a photo with:
- One person in frame.
- The clothing area fully visible.
- A natural standing or seated pose.
- Arms away from the torso.
- Soft, even lighting.
- A sharp face and body outline.
- A simple background.
- Enough space around the person for the new outfit.
If you only remember one rule, remember this: the AI should be changing clothes, not guessing the body.
The 8 rules for choosing a good source photo
These rules are ranked by how much they affect realism. If you only have time to fix one thing, make sure the best photo for an AI clothes changer shows the garment and body outline clearly.
1. Show the garment you want to replace
If the shirt, dress, jacket, or pants are cropped out, the model has to invent the missing area. That is when waistlines bend, sleeves melt, and hems stop making sense.
Best:
- Full top visible for shirt, blazer, sweater, or hoodie edits.
- Full body visible for dress, pants, suit, or skirt edits.
- Clear neckline and shoulders for professional outfit edits.
Risky:
- Mirror selfies cropped at the waist.
- Photos where hair covers the collar.
- Sitting poses where the lap hides the lower outfit.
2. Keep arms and hands away from the torso
Hands are a common failure point because they sit on top of the garment. Crossed arms, hands in pockets, phones in front of the shirt, and handbags over the chest all make the clothing boundary harder to read.
Best pose:
- Arms relaxed at the sides.
- Elbows slightly away from the body.
- Hands visible but not covering the clothing area.
If you only have a crossed-arm photo, try a smaller edit such as changing shirt color or jacket style. A full outfit swap is more likely to warp.
3. Use soft, even lighting
AI outfit edits work best when the original photo has stable light. Harsh shadows create fake seams. Mixed indoor lights can make the new clothing look pasted on.
Good light:
- Daylight near a window.
- Soft outdoor shade.
- One clear light direction.
Avoid:
- Flash reflection on fabric.
- Strong side shadows across the torso.
- Backlit silhouettes.
- Neon or colored light unless you want the final result to keep that mood.
4. Choose a simple background
The background should not compete with the clothing. Busy shelves, crowded streets, patterned walls, and mirrors can confuse the body outline.
A simple background helps the AI keep the edit localized to the outfit. It also makes the final image look more intentional, especially for profile photos and ecommerce-style previews.
5. Use a natural camera angle
Extreme angles change body proportions. A low-angle selfie can make legs and torso hard to map. A high-angle mirror shot can compress the shoulders and neckline.
Best angles:
- Straight-on upper-body photo for shirts, suits, and sweaters.
- Straight-on full-body photo for dresses, pants, coats, and full outfits.
- Slight three-quarter angle if the clothing edges are still visible.
Avoid fisheye, wide-angle distortion, and extreme selfie angles when realism matters.
6. Keep the person sharp
Motion blur, low resolution, compression, and heavy filters reduce the detail the AI needs to preserve identity and clothing shape.
Check before upload:
- Can you see the collar or neckline?
- Are sleeve edges readable?
- Is the face sharp?
- Are the hands and shoulders clear?
- Is the image large enough to crop without falling apart?
If the source photo looks soft before editing, the clothes swap will usually look softer.
7. Match the photo to the outfit goal
Different outfit goals need different source photos.
| Outfit goal | Best source photo | Why |
|---|---|---|
| Put on a suit | Upper-body or full-body front photo with visible shoulders | The AI needs collar, lapel, and shoulder structure |
| Try a dress | Full-body standing photo | Dress shape depends on torso, waist, hips, and hem |
| Change a hoodie to a sweater | Upper-body photo with relaxed arms | Similar silhouette keeps the edit believable |
| Preview pants | Full-body photo with legs visible | Cropped legs force the model to invent fit and length |
| Recolor a shirt | Any sharp photo where the shirt boundary is clear | Shape stays the same, so only color changes |
If your goal is a dramatic fashion transformation, give the AI a photo that supports it.
8. Leave room around the body
If the person touches the edge of the frame, the new garment may get clipped. This matters for coats, dresses, wide sleeves, flared pants, and layered outfits.
Leave extra space around:
- Shoulders.
- Sleeves.
- Hemline.
- Shoes if doing a full outfit.
- Hair if the neckline will change.
Cropping can happen after the edit. It is harder to add missing space after the model has already generated the outfit.
Photo quality scorecard
Use this quick score before uploading:
| Check | 0 points | 1 point | 2 points |
|---|---|---|---|
| Garment visibility | Mostly hidden | Partly visible | Fully visible |
| Pose | Crossed/covered | Slightly angled | Open and natural |
| Lighting | Harsh or mixed | Usable | Soft and even |
| Sharpness | Blurry | Acceptable | Crisp |
| Background | Busy | Some clutter | Simple |
| Crop | Clothing cut off | Tight crop | Room around body |
Score:
- 10-12 points: render now.
- 7-9 points: usable, but keep the prompt simple.
- 0-6 points: retake or crop before editing.
If the source photo fails the basics, a retake is usually faster than five regenerations.
What if you only have a bad photo?
You can still try, but narrow the job.
If the photo is blurry:
- Do not request detailed fabric.
- Use simple garments.
- Avoid tiny patterns, lace, logos, and text.
If arms cover the torso:
- Try a color change first.
- Choose a garment similar to the original silhouette.
- Avoid jackets, lapels, and button-up shirts.
If the photo is cropped:
- Edit only the visible area.
- Avoid full-body outfit prompts.
- Use a headshot-style change such as shirt, blazer, sweater, or blouse.
If the background is busy:
- Add "keep background unchanged" to the prompt.
- Avoid editing accessories and background at the same time.
- Crop closer to the person if that keeps the clothing visible.
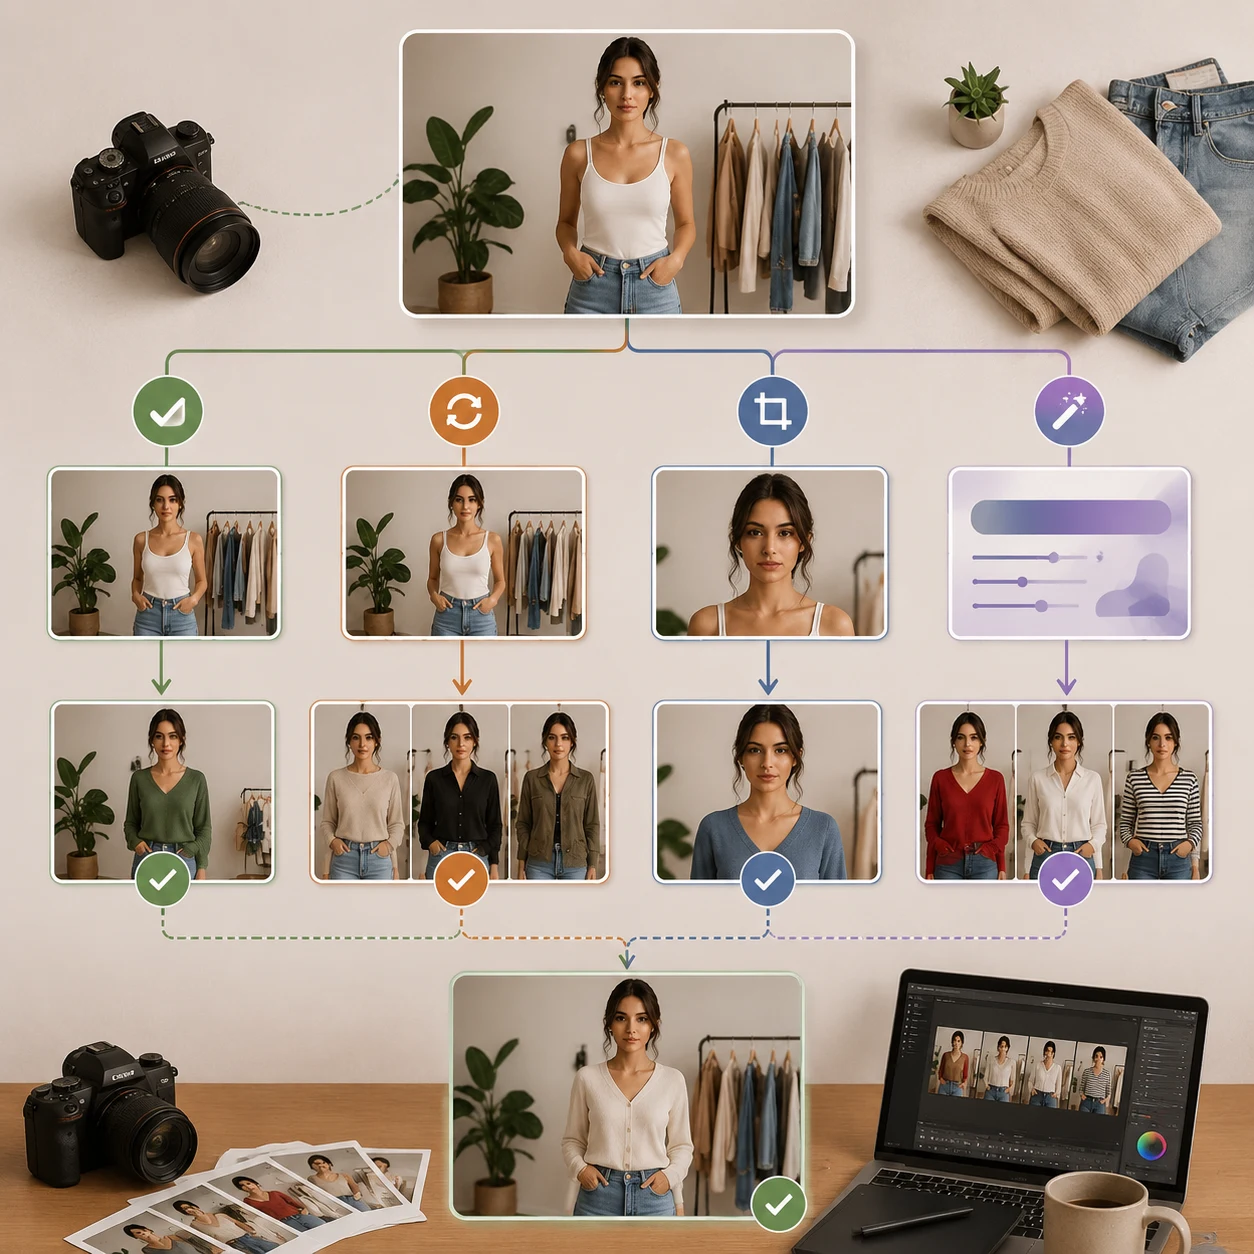
Best prompt for a good source photo
Once the photo is clean, use a prompt that preserves the person:
Keep the same person, face, hair, pose, body shape, lighting, and background. Change only the clothing to [target outfit]. The outfit should be [color], [fit], [material]. Keep the neckline, shoulders, hands, and skin natural.
Examples:
| Source photo | Prompt |
|---|---|
| Headshot in a hoodie | "Change only the hoodie to a navy blazer over a white shirt. Keep face, hair, pose, lighting, and background unchanged." |
| Full-body casual outfit | "Change the outfit to a simple black midi dress with short sleeves. Keep body shape, face, hands, and background unchanged." |
| Plain t-shirt photo | "Change only the t-shirt to a cream knit sweater. Natural crew neck, soft fabric texture, no logo, no changes to person or background." |
For a troubleshooting version, see why AI clothes swaps look fake.
Frequently asked questions
What kind of photo should I use for an AI clothes changer?
Use a sharp, well-lit photo where the person and clothing are clearly visible. The best source photo has an open pose, simple background, visible garment edges, and enough room around the body.
Can I use a selfie?
Yes, if the selfie is sharp and the clothing area is visible. Mirror selfies often work for full outfits, but avoid extreme angles, dirty mirrors, phones covering the shirt, or cropped legs.
Why do crossed arms make outfit edits worse?
Crossed arms cover the clothing boundary. The AI has to guess where sleeves, torso, collar, and fabric folds should go underneath the arms, which often causes warped hands or melted fabric.
Is a full-body photo better than a portrait?
It depends on the edit. Use a portrait or upper-body photo for shirts, suits, and sweaters. Use a full-body photo for dresses, pants, coats, skirts, and complete outfit previews.
Should I edit a blurry photo?
You can, but keep the edit simple. Blurry photos make fabric texture, seams, hands, and face details harder to preserve. A quick retake usually gives a better result than repeated regeneration.
Related guides
- Try the AI clothes changer
- Why AI clothes swaps look fake
- How to change clothes in a photo with AI
- Put a suit on your photo
- Change clothes color in a photo
- AI dress up
Use the photo as your first prompt
Before you write anything, make the photo easy to edit. Pick a sharp image with visible clothing, open posture, and soft light. Then open the AI clothes changer and ask for one outfit change at a time.